
Custom packaging inserts influence how a product sits inside its box, how it looks when the lid opens, and how easily someone can take it out.
A well-planned insert gives each item a defined position while leaving room for packing and removal. It can separate accessories, support vulnerable areas, and create a clear presentation. Its design also affects box dimensions, assembly work, and the overall packaging cost.
That makes material selection only part of the decision.
Tabla de contenido
- Define the Product and Its Packaging Journey
- Compare Materials for Custom Packaging Inserts
- Balance Secure Fit with Easy Removal
- Plan the Layout Before Finalizing the Box
- Compare the Complete Packaging Cost
- Check Samples with Actual Products
- Prepare a Clear Supplier Brief
- Frequently Asked Questions
- Plan Your Custom Packaging Inserts
Before asking for a black foam insert or a paper tray, start with a more useful question: how should this particular product be supported, handled, and removed?
The following seven checks will help you turn that question into a practical packaging brief.
1.Define the Product and Its Packaging Journey
Product length, width, and height are essential starting points. However, those measurements do not explain where an item needs support or which surfaces should avoid contact.
A glass perfume bottle, a coated metal accessory, and a skincare tube may occupy similar spaces while presenting different design challenges.
Before discussing insert materials, collect the following information.
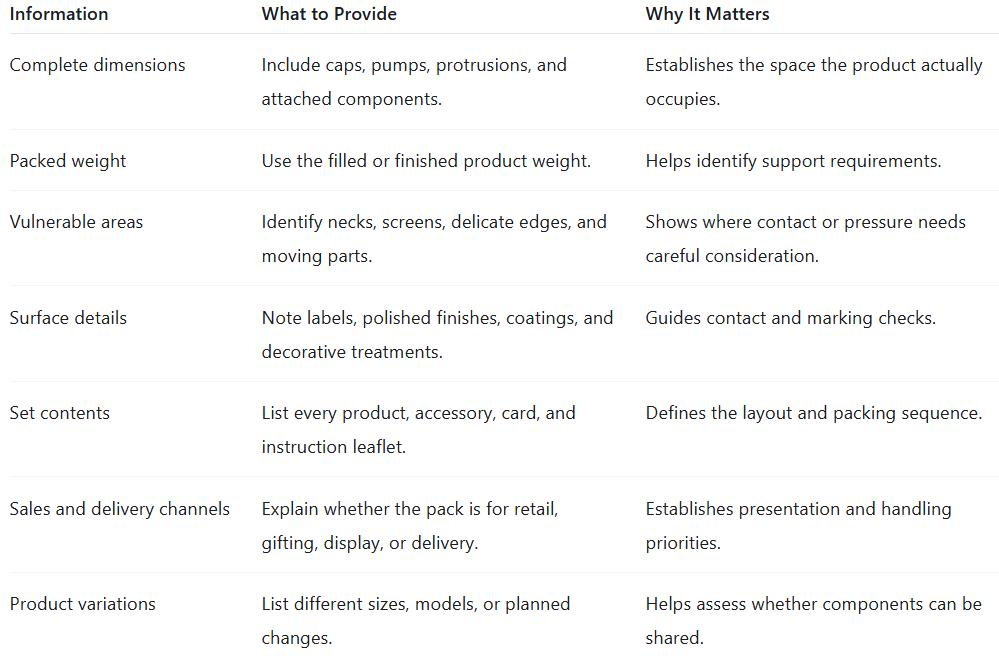
Provide an actual product whenever possible. If that is unavailable, send accurate drawings and clear photographs, and identify any dimensions that are still provisional.
An appearance rendering can help communicate a concept. Structural approval requires reliable measurements and a representative product.
Also explain how the packaging reaches the customer. A gift box handed over in a shop and a package moving through parcel delivery need different discussions about handling and outer protection.
2.Compare Materials for Custom Packaging Inserts
There is no single insert material that suits every product.
Compare candidates against the same requirements: support, separation, surface contact, presentation, assembly, and end-of-life handling.
Paperboard and Corrugated Inserts
Paperboard and corrugated inserts can use folded platforms, partitions, tabs, and openings to organize a box.
They are worth evaluating when the design calls for a paper-based structure or separate compartments for products and accessories.
The important question is how the assembled structure carries the product. Ask where the weight rests, how the sides restrict movement, and whether folds or tabs remain stable during packing and handling.
For a bottle-and-accessory set, for example, a raised platform might position the bottle while a separate compartment holds the accessory. The sample should show whether both areas remain stable when loaded.
Check exposed edges and contact points as well. A neatly cut insert still needs to be assessed against the product’s actual finish.
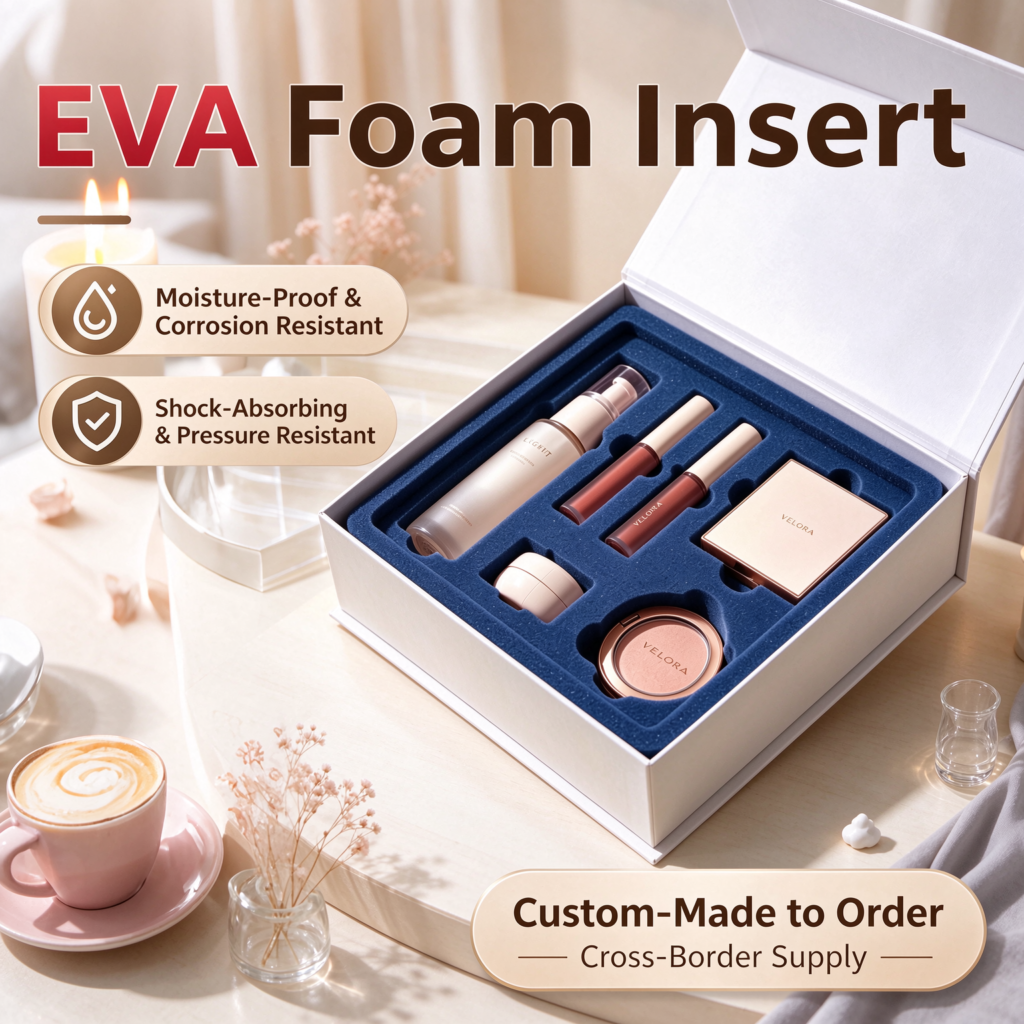
Foam Inserts
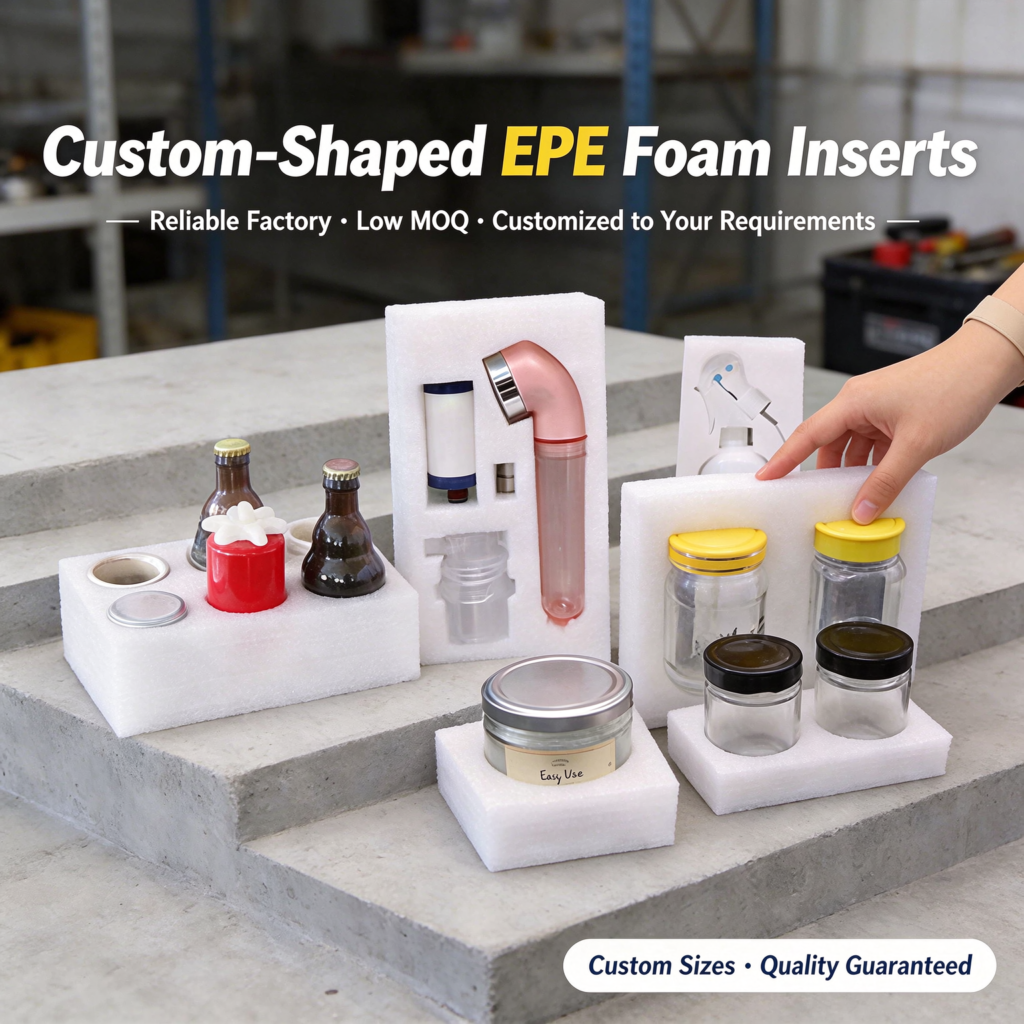
“Foam insert” is a broad description. A useful quotation should specify the foam type, density, thickness, construction, and any surface treatment.
Material suppliers offer polyethylene foam in different formats for cushioning, wrapping, and fabricated protective structures. Those options illustrate why a material name alone is insufficient for selecting a finished insert. Sealed Air’s polyethylene foam information provides examples.
For your project, ask the supplier to explain the proposed specification and how it will support the product.
Check the cutout shape, insertion force, removal method, and any marks left after contact. Confirm whether the sample uses the material intended for production.
Formed Plastic Trays
A formed plastic tray can be considered when the layout requires individual shaped cavities or a consistent arrangement of several items.
Discuss the resin type, material thickness, forming method, and dimensions that require particular control.
Pay attention to cavity edges and removal access. A tray can look orderly while leaving too little room for fingers to reach the product.
If the product range may change, ask which changes would require tooling modifications. That information belongs in the initial comparison, especially when several bottle or accessory sizes are planned.
Molded Pulp Inserts
Molded pulp is another candidate for a shaped paper-fiber insert.
Discuss the proposed support geometry, surface requirements, dimensional fit, and tooling process with the supplier.
For products with sensitive finishes, include actual contact checks in sampling. If product dimensions are likely to change, establish how revisions would affect the tooling, schedule, and cost.
Material appearance also deserves a clear specification. Review a representative sample rather than assuming that all molded pulp inserts will have the same texture or finish.
A Practical Material Comparison
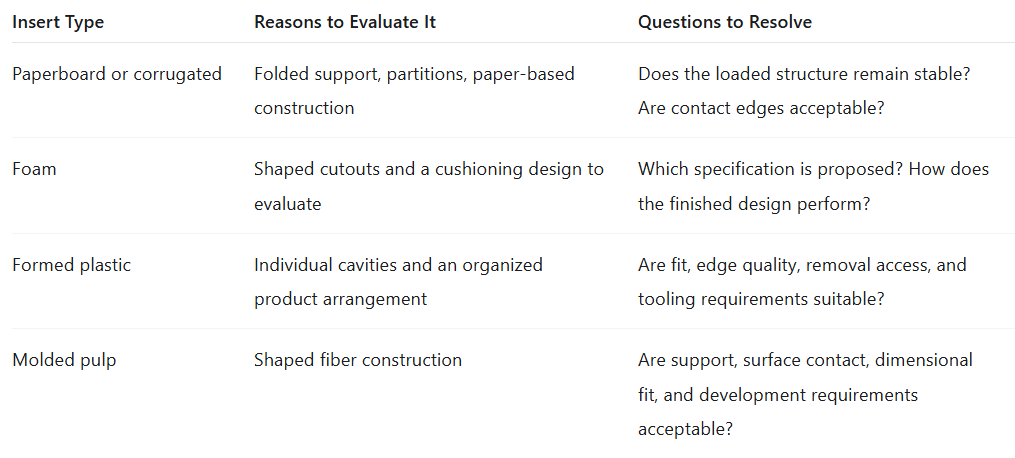
Treat this table as a shortlist tool. Final selection depends on the finished design and its validation.
For recycling claims, confirm the complete material construction and the collection options in the intended market. Coatings, laminations, adhesives, and combined components can affect how the finished insert is handled.
3. Balance Secure Fit with Easy Removal
A product should sit in its intended position and remain accessible to the person unpacking it.
Review four parts of the structure.
Support Points
Identify which areas carry the product’s weight.
Check whether those areas remain stable and whether the design puts pressure on delicate components, labels, or decorative surfaces.
For a bottle, ask the designer to show how the base and body are supported and where clearance is required.
Side Restraint
Check whether the product can slide, rotate, or lean into another item.
Round products and irregular shapes may need different restraint features. Include accessories in this review: a loose cable or small attachment can move even when the main product stays in place.
Clearance Above the Product
Assemble the complete package and close the lid.
Check for unintended contact with caps, pumps, protrusions, or product surfaces. An empty-box measurement cannot reveal every issue that appears after all components are packed.
Removal Access
Try taking the product out in the way a customer would.
Can fingers reach a suitable gripping area? Does the user need to pull on the cap, bend the insert, or turn the box upside down?
Depending on the structure, possible adjustments include a finger notch, a shallower opening, an exposed gripping area, or a pull ribbon. Each adjustment should be checked against the support requirements.
A tighter opening is not automatically a better fit. Excessive tightness can make packing difficult or create unwanted pressure. Too much clearance can allow movement.
Agree on the fit using samples and the expected manufacturing variation of both the product and insert.
4.Plan the Layout Before Finalizing the Box
The insert layout helps determine the space the outer box needs.
If the box is fixed too early, the remaining space may force compromises in support, separation, or removal access.
Consider at least two layouts before approving the dimensions.
For illustration, imagine a gift set containing a full-size perfume bottle, a sample vial, and an information card. This is a hypothetical comparison, rather than a customer case.
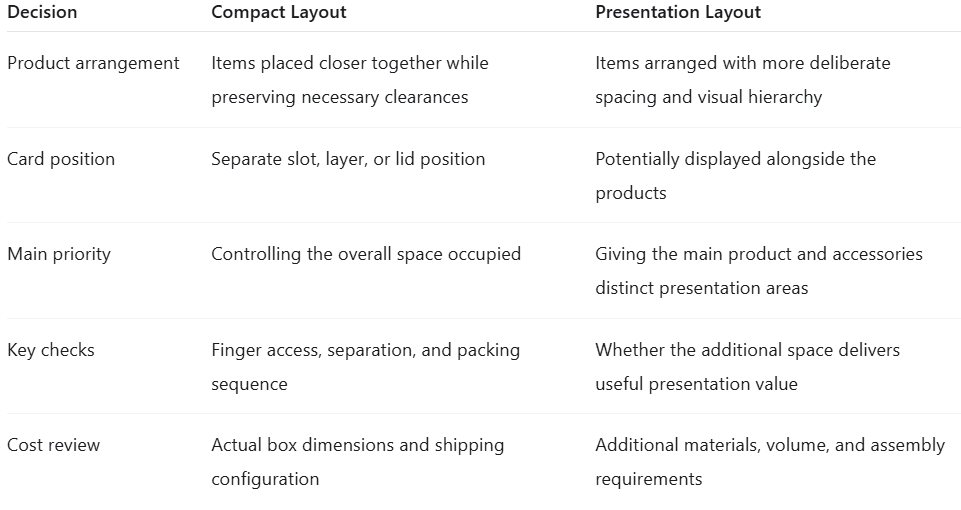
Neither arrangement should be approved from a rendering alone.
Use actual products or accurate models to compare the options. Then confirm insert depth, support features, box closure, and the packing sequence.
If you are developing a bottled-product set, Taiwei Packaging’s custom glass bottle perfume box offers a relevant starting point for discussing the relationship between a rigid box and its insert.
Use the product example to communicate a direction. Confirm the final structure against your own bottle and packaging requirements.
5.Compare the Complete Packaging Cost
Two insert quotations can have similar unit prices while covering different materials, processes, and delivery conditions.
Break the comparison into three groups.
Development Costs
Ask which charges cover structural design, samples, cutting dies, forming tools, or molds.
Also establish what happens if dimensions change after the first sample. Clarify which revisions are included and which require additional work.
Per-Set Costs
Check whether the price includes material, cutting or forming, coverings, bonding, and assembly.
Confirm whether the outer box is included. If the insert arrives separately, identify who will install it and what that operation involves.
Delivery and Use Costs
Ask how the inserts will be supplied: flat, nested, stacked, or fully assembled.
That affects the information needed to compare delivery volume, storage, and packing work. Changes to the insert may also change the outer box and shipping configuration.
A useful comparison framework is:
Total comparison cost = development charges + order quantity × per-set cost + relevant assembly and logistics costs.
Use actual project figures for each item. Avoid assuming savings before the package dimensions, packing method, and delivery conditions are known.
Request quotations against the same product list, quantity, and requirements. If a supplier proposes an alternative material, ask for the specification differences and any checks that would need to be repeated.
6.Check Samples with Actual Products
Sampling is where layout decisions meet real handling.
Begin by identifying what kind of sample you have received. A structural sample, an appearance sample, and a sample made with proposed production materials may confirm different things.
Then follow the actual packing and unpacking sequence.
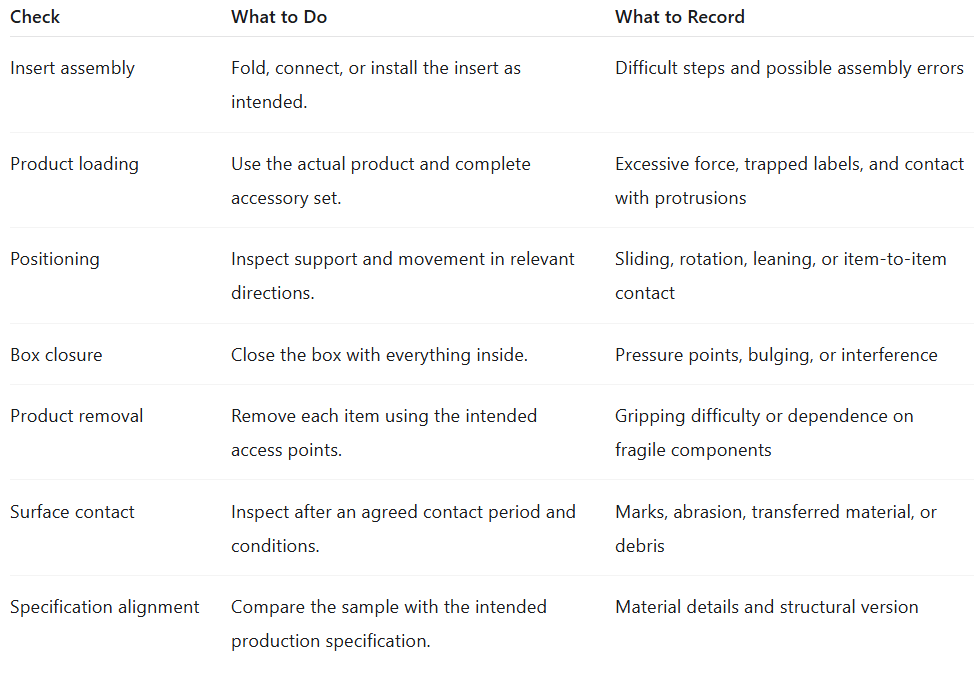
Gentle changes in orientation may reveal obvious looseness. They do not establish transport protection.
For delivery applications, evaluate the complete packaged product: the item, insert, presentation box, shipping container, and any additional protective materials.
ISTA distinguishes early screening tests from procedures that simulate transport hazards. Select the procedure according to the distribution environment and intended outcome, with guidance from the supplier or testing laboratory. ISTA’s test procedure guidance explains these differences.
Before testing, agree on what counts as acceptable product and packaging condition. Record the final structure, material specification, and sample approval.
If the product, material, or structure later changes, review which checks need to be repeated.
7.Prepare a Clear Supplier Brief
A detailed brief helps suppliers propose comparable solutions and reduces avoidable questions during development.
You can use the following template.
| Brief Item | Details to Supply |
|---|---|
| Product | Name, intended use, photographs, and available samples |
| Dimensions and weight | Complete measurements, packed weight, and relevant tolerances |
| Set contents | Number of products, accessories, cards, and leaflets |
| Contact restrictions | Vulnerable areas and surfaces that need special attention |
| Outer box | Internal usable dimensions, or a request to design the box and insert together |
| Packaging journey | Retail, gifting, display, parcel delivery, or another channel |
| Material preferences | Preferred options or a request to compare alternatives |
| Quantity | Initial order quantity and expected repeat requirements |
| Product changes | Planned sizes, models, or accessories |
| Finish requirements | Appearance, printing, covering, and material separation preferences |
| Validation | Sample expectations and relevant performance checks |
| Timing and budget | Required dates and a budget range, if available |
If you have not selected a material, request two clearly defined options.
For example, ask for one layout that prioritizes compact dimensions and another that prioritizes presentation. Both should still meet the necessary support and removal requirements.
Ask the supplier to explain the tradeoffs, cost components, and validation needs for each.
Frequently Asked Questions
Should custom packaging inserts hold products as tightly as possible?
The fit should provide the required restraint while allowing practical packing and removal.
Excessive tightness can create pressure or make products difficult to handle. Excessive clearance can allow movement. Confirm the fit with actual products and account for expected manufacturing variation.
Can cardboard inserts be used for glass bottles?
They can be evaluated as a candidate.
The decision depends on the bottle’s weight and shape, the support structure, and the complete packaging system. For delivery applications, validate the assembled package against the relevant handling and transport requirements.
Does higher foam density always mean better protection?
Density is one part of the specification.
Foam type, thickness, support area, product weight, and the expected impact conditions also matter. Ask for the selection rationale and evaluate the proposed design using appropriate checks.
Can one insert fit several product models?
A shared structure may be possible, including replaceable sections or localized adjustments.
Check every model individually. A common insert that leaves substantial unused space may require extra components or packing work. Compare the complete cost and handling results before approving it.
Can the insert be redesigned after the box size is fixed?
Often, options can be explored within the available space.
Provide the actual internal usable dimensions, including height after closure and space occupied by other components. If support, separation, and removal access cannot all fit, the box dimensions may need reconsideration.
How can I assess whether an insert is recyclable?
Identify the finished material construction, including coatings, coverings, adhesives, and combined components.
Then check collection and processing options in the intended market. Any recycling statement should match the actual insert and its applicable conditions.
Plan Your Custom Packaging Inserts
Choosing custom packaging inserts means coordinating product support, contact surfaces, removal access, presentation, and cost.
Start with accurate product information. Compare layouts before fixing the box dimensions. Use samples to confirm the details, and validate delivery protection where the application requires it.
If you are planning packaging for perfume, skincare, electronic accessories, or a gift set, send Taiwei Packaging your product photographs, dimensions, weight, set contents, and expected quantity.
These details provide a practical starting point for discussing the box and insert together.
Discuss your custom packaging requirements with Taiwei Packaging.